My current Citrix XenDesktop environment has out grown its original IP scope and I wanted to move it to a new dedicated VLAN with scope to grow even more. Below is brief guide in the steps taken.
Stage 1 – Creating the DHCP Scope
• Logged onto your DC and open DHCP, drill down on IPv4, right click and select New Scope.

• Give the Scope a name “Citrix Guest VM’s” and description.

• Enter the IP range you would like addresses DHCP to give out (it always a could idea to leave some spare at the end for static IPs)
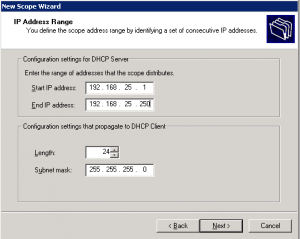
• Add any exclusions you wish
• Lease duration I left default of 8 days
• Proceed to “Yes, I want to configure these options now”
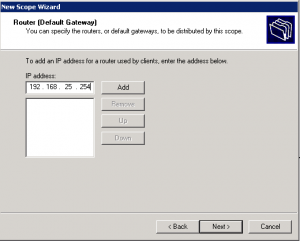
• Default Gateway is the IP address you will assign your Core Switch / Router in your network when creating the VLAN in the next stage. 192.168.25.254
• Next select/enter your DNS servers
• WINS Server if any
• Active Scope – Select “Yes, I want to activate this scope now”
• Finish
Stage 2 – Creating a new VLAN
In my environment we use HP Procurve Switches, so the following config are HP cmds.
• Log on to your Core Switch / Router and use the follow config.
conf t
vlan 3025
name "Citrix Guest VMs"
ip address 192.168.25.254 255.255.255.0
ip helper-address 192.168.250.2
ip helper-address 192.168.250.2
tagged ?????
exit
wr mem
Config Break down
1 Enter configuration mode
2. Created VLAN 3025
3. Naming the VLAN
4. Creating the default gateway ip address for the VLAN
5 & 6. DHCP Servers
7. Tagging – You need to tagged any ports you would like to traffic to run through, see below.
8. Exit VLAN config
9. Save
Tagging
You need to proceed to create the VLAN and tagged the ports through your network you intend the traffic to run through. In my situation I stated by creating the VLAN on both core switches and had to tagged ports through to my server rack switches and then uplinks to my ESXi Hosts.

Testing
Once all the tagging was done I wanted to do some testing before I moved onto VMware VCentre.
From my core switch I untagged a port on VLAN 3025 (untagged assigns an the device connected to that port the IP in that specified VLAN). Plugged in my laptop and check the address assigned. It was a success I received a address from the 192.168.25.0/24 range, I could double check this by looking at the address leased on the DHCP server.
If you was not successful at this point please go back and review as the stage will not work
Stage 3 – VMware VCentre
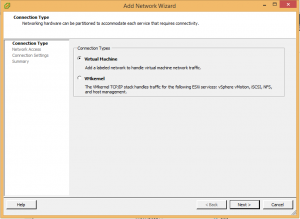
• Adding the Virtual Machine Port Group (VLAN) onto a vSwitch (virtual switch) in VMware
Open up VMware Client, navigate to the your Cluster
– Select your host (if you have mulitple you will need to do this to all of them)- Select the Configuration tab
– Select Networking from the left side menu
– Click ” Add Networking at the top”

Add Virtual Machine, click next
Select the vSwitch you are currently using, for exmaple mine is “vSwitch0″

Give the Port Group a name, i suggest using the same as the VLAN on the physical switches.
Enter the VLAN ID – 3025
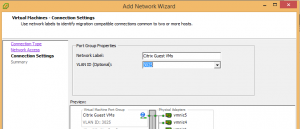
View Summery and Click Finish.
You have now added a new VLAN (port Group) into VMware ESXi and can now been given to VMs, in our case our VDI solution.
To check this, edit any VM which is sitting on any of the host you have just configured, select the NIC and you should be able to drop now the menu to select “Citrix Guest VMs” network.

Now this is great, you are able to change the VM to a new network…… but I have 200 VMs!
It is not feasible to sit there and manually reconfigure and 200 machines and reboot them, plus you would be taking down your environment for a long time.
Stage 4 – VMware vSphere PowerCLI
How to automate the NIC change for multiple VMs
1. Download VMware vSphere PowerCLI
https://my.vmware.com/web/vmware/details?downloadGroup=PCLI550&productId=352
2. Install and connect to you Vcentre Server
Connect-VIServer –Server VCENTER_SERVERNAME

Once Successfully connected you can start issuing powershell commands. Use get-vicommand to see a list of all PowerCLI commands.
To complete this task we just need:
– The list of machines from the XenDesktop machine catalog.
Commands used:
Get-VM: to obtain list of VM
Get-NetworkAdapter: to find list of VMs on VLAN
Set-NetworkAdapter: to change the VLAN
Scenario:
– Machine Catalog Name: “Admin Desktop”
– Machine names: “monvdiad##”
-Current Network: “Server Network”
-New Network: “Citrix Guest VMs”
** Make sure the account you are using have elevated rights in vSphere
PowerCLI Commands to change VLAN
To obtain a list of all XenDekstop VMs in that catalog issue following command use the wildcard display all machines that start with “MONVDIAD*”
Get-vm –Name “monvdiad*”
If the above query returns the list of the correct VM’s then proceed to change the NIC with the code below.
Get-vm -Name “monvdiac*” | Get-NetworkAdapter | where {$_.NetworkName -eq "Server Network"} | Set-NetworkAdapter -NetworkName "Citrix Guest VMs" -Connected: $false | Set-NetworkAdapter -Connected: $true
Press “A” to accept the changes and watch the magic begin.
Once complete I personally would give the affected VM’s a reboot with the following cmd
Get-VM –Name “monvdiac*” | Restart-VM
Again press “A” to accept
You can check your work by manually check a VM or issue the following cmd which will query and display any VM using “Citrix Guest VMs” Port Group as a selected network.
Get-vm –Name “monvdi*” | Get-NetworkAdapter | where {$_.NetworkName –eq “Citrix Guest VMs”}
Jobs a good un!
